

The table measures roughly 100 x 140 cm and is 92 cm high.
As some of you may have gotten or known, we bought a house and moved to Bavaria this year, and with it a new sewing room. Before, I always did my sewing at the kitchen table. We didn't have a formal dining area, so this multi-purpose room (sewing, breakfast/lunch/dinner, homework, crafting) got a little crowded at times. I really enjoyed sewing there on our dining table which was light birch wood.
Wow, a whole room for my sewing (and crafting). How much better can life get? I had a clean slate to design my area. I thought and designed and thought and designed. I am so happy I allowed myself time to think about it.
When we first moved in, everything got cluttered up in there - all of my fabric, hallway tables, two desks, crafts, bulletin boards, chairs, etc., etc. A couple of months later, I started to take the matter at hand and start to purge and organize (after most of the other fires in the house were tamed like light fixtures and kids' rooms). My husband was kind enough to offer me his office table which is 180 x 60 cm. This is really a great table and matches another smaller table of 120 x 60 cm (both from Ikea) which I wanted to use for my sewing. Of course, it is great to have such a LARGE table for basting and laying out patterns, and I was really thankful that my husband offered it to me, BUT I thought it took up too much space in my room to serve just one purpose of a table. I wanted storage room under the table. Do you know what I am talking about? I read blogs and looked for solutions and found that other sewers also had the same "beef". I need it simple-easy-practical (and multi-purpose).

Most of the ideas I found involved Expedit shelving from Ikea. (I love Swedish design and not just from Ikea.) I found a really nice cutting table using 2 (2 x 4) Expedit shelves and a butcher blog top on wheels. Probably most of you have seen this? I wanted my cutting table smaller so I can also put in a couple of book shelves for storing books and fabrics, so I found another version at Ikea Hackers for an awesome cutting table using 3 (2 x 2) Expedit shelves. I wanted to have legs on mine so I could sweep under the table when needed. (I hope I don't need wheels or casters in the future.)
My husband was really wonderful and did most of the work for me!! Thank you, Schatz!
Here is the material list:
| QTY | Description | Price | ||||||||
| 3 | 2 x 2 Expedit shelves or similar | 66€ | ||||||||
| 8 | Capita 11 cm legs | 20€ | ||||||||
| 1 | 118 x 79 cm Pressed Board? "Spannplatte" | 10€ | ||||||||
| 10 | Small L-Brackets | 15€ | ||||||||
| 1 | 100 x 140 cm Butcher Block Counter Top (beech wood unfinished) 18 mm thick | 60€ | ||||||||
| 50? | Wood Screws | |||||||||
| 1 | Can of Birch Color Wax-Stain | 12€ | ||||||||
| 1 | Strong and Willing Partner to do the dirty work | |||||||||
| Various Grains of Sand Paper | ||||||||||
| 2 | Optional Drawer Set of 2 for Expedit | 30€ | ||||||||
| Rough Expenses | 200€ |
We started by putting the shelves together per Ikea instructions. (My husband has become THE Ikea furniture builder the last couple of months.) After I sanded the edges of the pressed board, we then set it on top and screwed them in place. There will be a one centimeter gap between the shelves that butt up back to back. That is one reason why the additional board is needed. Then attach the legs. We were very calculated when lining up and measuring the distance of the legs. I am a quilter and have all of the necessary tools. ;-) Please refer to diagram for a better idea of where to put the wood screws; remember, there is a gap between the shelves. (We first attached only six legs and found that it needed more stability in the middle. Seven legs give a good design and added stability.) Here is a good stopping point.
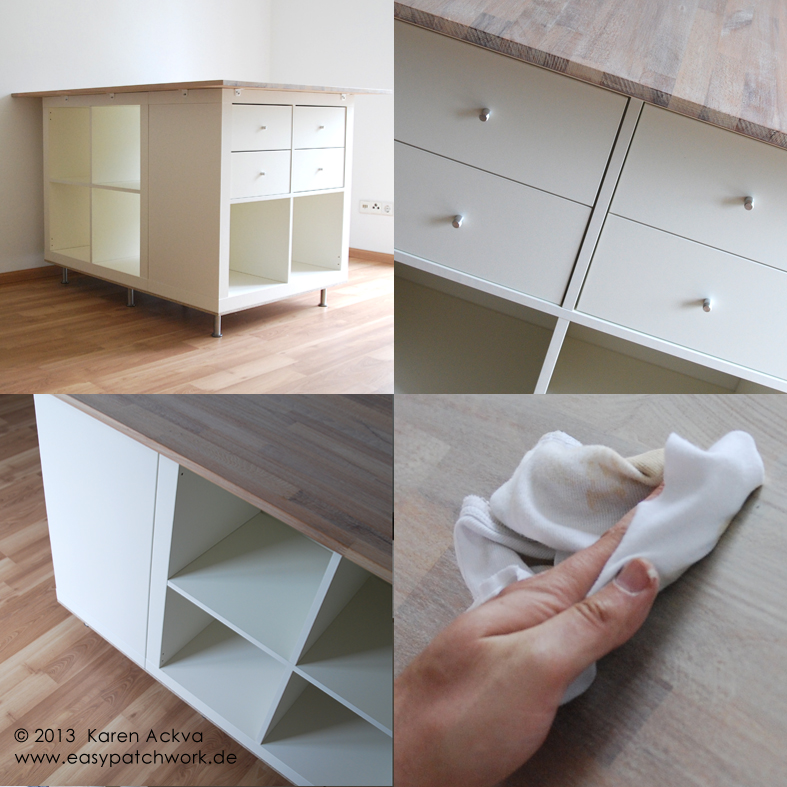
Oh, my hubby only stained the top and sides per my request. If your counter top is not super flat, you will want to stain the side that is bowed up like a boat. When the board is screwed down to the base, it will level out better.
 Then we put the counter top on the floor right side down and the base on top. We centered the base, pre-drilled wholes for the wood screws and screwed the L-Brackets to three adjacent sides of the counter top. The base was flipped back over and counter top was slid over one end. Then the counter top was screwed to the last side and then to the base. We carefully flipped the table back over one last time and voila!
I was so excited to see my table finally set up....I took some snapshots and ran to the basement for my quilting books and magazines. (Check) Two more boxes sorted and emptied. Twenty to go.
If you build this cutting and crafting table, leave me a comment so I can check it out.
I look forward to sharing more ideas from my sewing room in the future. Stay tuned and keep sewing and crafting.
Yours truly,
Karen
Update: Some things I forgot to mention in the post yesterday.
If you don't want to spend the money for a butcher block counter top, just buy a second piece of pressed or chip board the same size as the base. Invest the money into large cutting mats and your cutting surface is finished. I personally like the look and feel of wood, so this was a better option for me.
Also, there is a gap between the cutting table and the wall! I thought about this before we made the table. We could have extended the cutting top on three sides and left the base flush with the wall, but then my options of moving it around in the room would have been limited. Now, I have a little extra space at the end of the table (where the wall is) where I can put my large cutting mat or rather my travel bag with cutting mat and rulers.
If you don't want to put legs on the base, you could also attach spacers at the top and raise the counter top up so the table is at a good height for cutting. Ninety centimeters is a good height for a 5'5" quilter. Then, you could put your mat and rulers between the base and the counter top. I would still recommend connecting all three shelves at the bottom and top though.
Oh, also, these shelves and drawers come in a variety of colors now from pink to turquoise. Go wild!
Ich wünsch Dir ganz viel Spaß in Deinem neuen Nähzimmre mit dem super coolen Zuschneide Tisch!
ReplyDeleteLG
KATRIN W.
hihi, gerade über IKEA HACKERS entdeckt!
ReplyDeleteUnd GENAU SO einen habe ich mir auch für meinen Laden gebaut! ;)
Ganz viel Spaß daran beim arbeiten & ich mag es total gerne (und mein Rücken auch! :D
Liebe Grüße
Maria
I love this! I want one in my craft room!
ReplyDeleteWhat size length were your wood screws? Awesome table. Thanks for sharing!
ReplyDeleteHi Holly! I consulted my handy man, and he told me that we used 3,5mm screws. For the base (Ikea shelves) it doesn't matter too much, because they are hollow. When connecting the counter top, he used shorter 16mm flathead screws being careful when pre-drilling the holes with a stop attachment so the drill bit doesn't drill all the way through. Those little holes on the the topside aren't really attractive and just collect fabric schnippsels. ;-)
DeleteUnderconstruction (Pressed Board) to Shelves - 3 x 20 mm (flathead screws)
Feet to Base - 3 x 20 mm (rounded screws)
Base to Countertop - 3,5 x 16 mm (flathead screws)
This worked for us. You may need to adapt your measurements. Kind regards, Karen
Herzlichen Dank für die großartige Bauanleitung! Mein jetziges Nähzimmer ist zwar ein wenig zu klein für diesen tollen Zuschneidetisch, aber ich arbeite an einer Veränderung. :-)
ReplyDeleteEinen schönen Tag wünscht
Renate
Hallo Renate! Man könnte auch den Tisch verkleinern, wenn man nur 2x (2x2) Expedit-Regale verwendet und dann eine zugeschnittene Spanplatte oben drauf schraubt. Dann kommt der Tisch auf 79 x 79 cm. Ich bin auf deine "Veränderung" gespannt. Schick mir bitte ein Link, wenn es soweit ist. ;-) Liebe Grüße - Karen
DeleteI found this on Ikea Hacker and had to come over to tell you how much I love this! It is the perfect solution for a new craft room which is much smaller than my old one - due to number one son finishing university and moving back home. He didn't want the smaller room!!!! This one piece will allow me to combine 3 pieces of furniture so that is why I wanted to say thank you! It is a pity I don't have a 'handy man' (forget number one son, and number two also)! I hope I am able to 'do the work myself' when I have time to do this project!
ReplyDeleteHi Jowel! I am sure you can construct your crafting table all by yourself. It must fit your needs and your space. I would love to see a picture of your finished product. Kind regards, Karen
DeleteLove it. How wonderful. That is a dream to have such a large working usrface. Thanks for sharing.
ReplyDeleteHi- love your cutting table. Could you please tell me where you saw the original table made from 2x (2x4 Expedit book shelves) thank you.
ReplyDeleteHello,
ReplyDeleteI love your cutting table! Perfect size for small sewing rooms.
Did you use the Expedit white or high-gloss white shelving unit?
Hello,
ReplyDeleteI love your cutting table! Perfect size for small sewing rooms.
Did you use the Expedit white or high-gloss white shelving unit?
I love your cutting table too! I have been searching Pinterest for months looking for a design I could do myself (with my hubby's help). This is perfect. I am ready to attach the base plywood and the top. Did you anchor the Expedits together in any way? I am just worrying about flipping the unit over if they are just attached at the base? Thanks again for posting. I love all the pictures :)
ReplyDeleteHi,
ReplyDeletedarf ich Dich um eine Antwort bitten?
Wie habt ihr herausgefunden, wo die nicht-hohlen Stellen der Seitenteile sind - wo also die Schrauben halten?
Mein armer Mann bekommt gerade einen Verzweiflungsanfall...
Beim Bau haben wir gar nicht auf hohle Teile geachtet. Die Wanddicke sollte auch ihre 5mm haben. Wir haben 2cm Randabstand für die Schrauben eingehalten.
DeleteZum Verschrauben mit der Basisplatte haben wir ca. 30-40 dünne Holzschrauben verwendet. Beim Rumdrehen des Tisches (nachdem die Füße befestigt sind), muss man a) vorsichtig und b) mindestens zu zweit sein. Kurzzeitige Gefahr des Ausreißens.
Zum Befestigen der Deckplatte mit Winkeln haben wir dann fette, kurze Schrauben genommen (Kerndurchmesser vorbohren!). Schrauben mit Gefühl anziehen.
Viele Erfolg – Karens Hubby
P.S.: Ich antworte gerne, aber hinterlasst doch bitte euren Namen, nicht anonym.
Karen, thank you so much for sharing your desk project! We are moving soon and I am getting the Bonus room as my Craft Studio~ I do everything from scrapping to sewing, beading to painting, so you can imagine how excited (and grateful to hubby!) I am :) I've been searching for the "perfect" cutting table for a year and I'm going to Ikea next week for my supplies!
ReplyDeleteI wanted to let you know I'm going to tweek your pattern a bit so that the counter top extends off base enough to cut a slot in it and put a recycle can underneath, that way I can just slide scraps into slot instead of gathering and twisting to find my can! :)
Thanks again for your share!
Shelly Scherbarth
Trinkets~N~DooDads
Hallo Karen,
ReplyDeleteda habt ihr einen sehr schönen Tisch gebaut.
Verrätst du mir, wo du die obere Platte gekauft hast?
Danke und liebe Grüße, Marie