Sunday, December 18, 2016

my last pillow

As the year comes to a close so does the Pillow Swap Four Seasons. This swap started two years ago as an idea shared by Sandra at Hohenbrunnquilterin (Munich, Germany) and myself to bring a little bit of seasonal cheer into our homes and the quilting/swapping community. We envisioned the group as a forum to share creativity and help with the sewing/pillow-making process.

We met a lot of really great ladies who participated in the group, shared their design-making process, and delivered amazing, excellent quality decorative pillows. It was a wonderful experience! I know I am repeating myself from my previous post, but I am going to miss this group!

I wanted to share the last pillow that I made in the group for my partner, Andrea.

Sneak Peek of Last Pillow

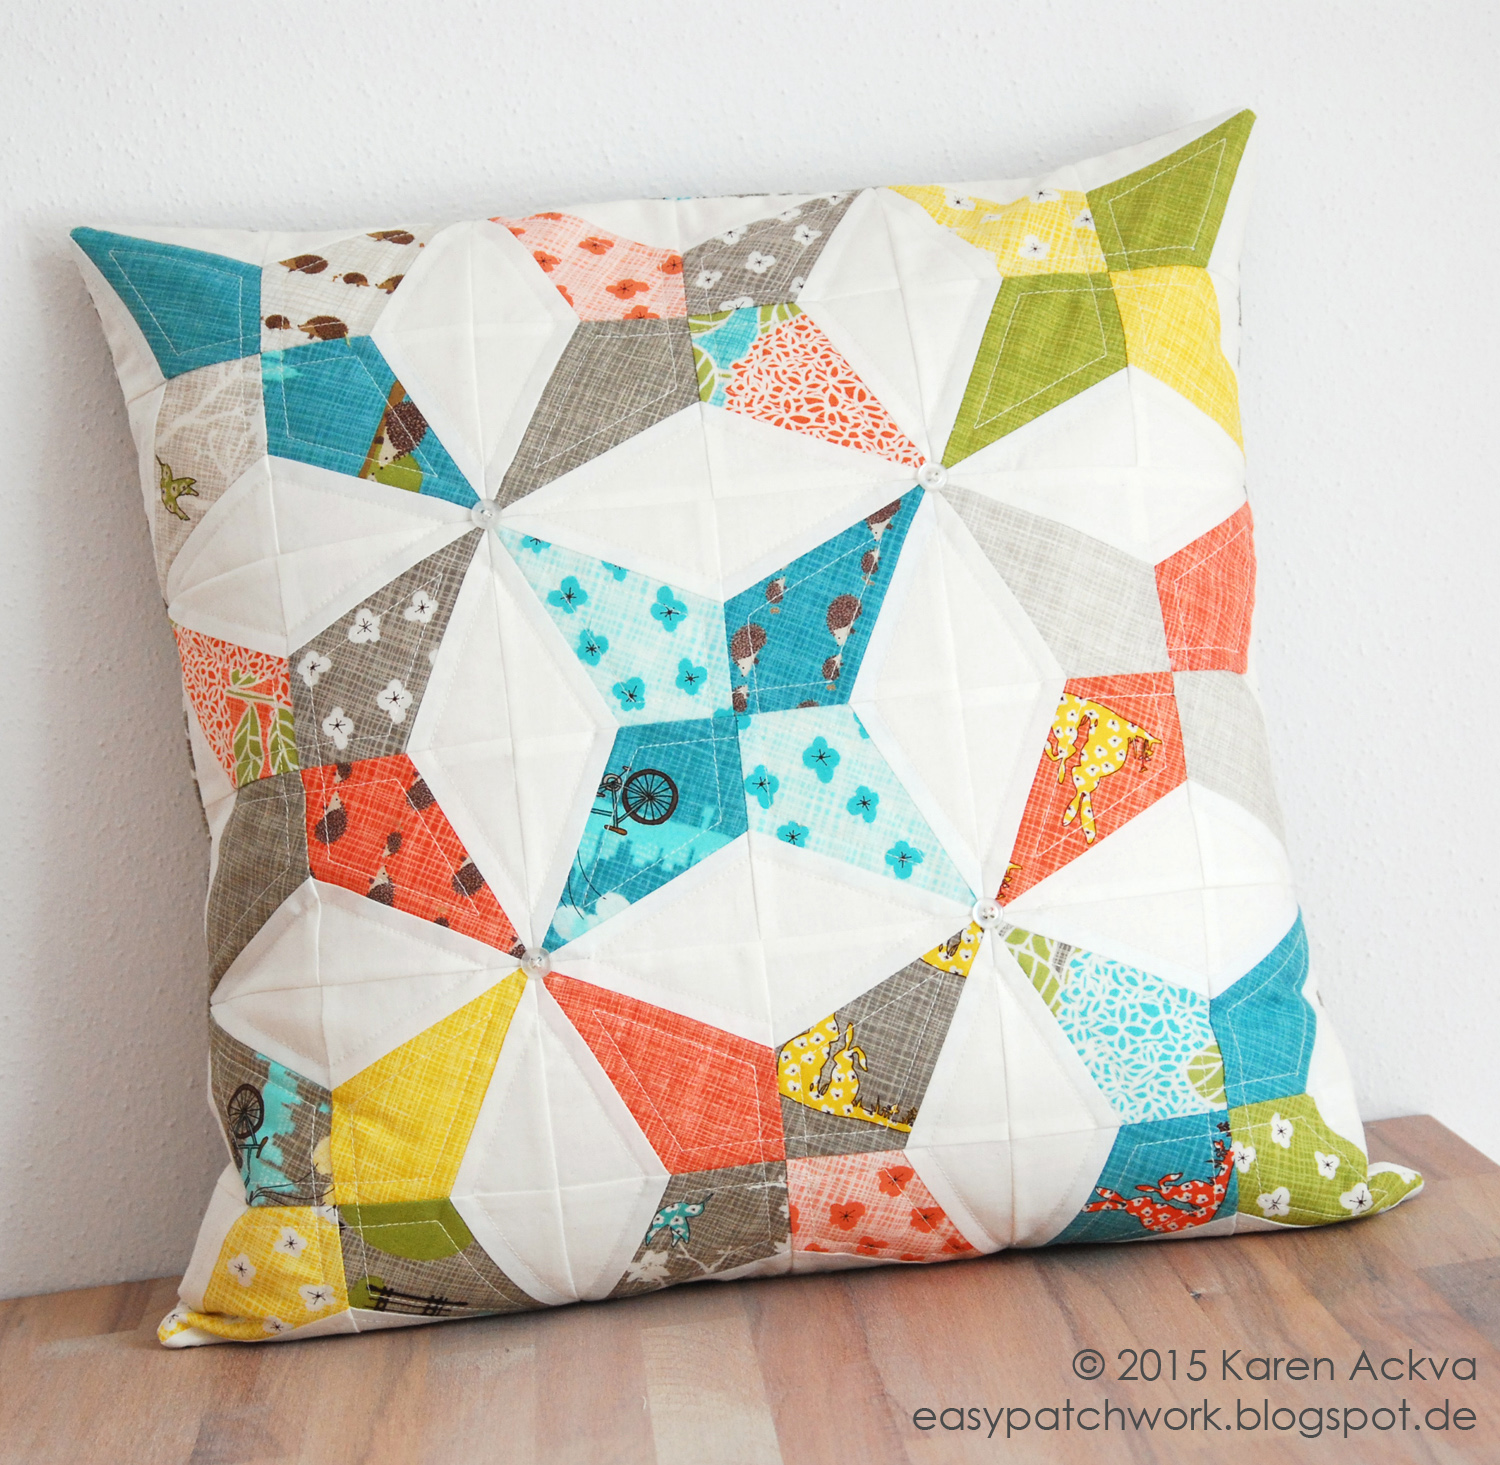
A lot of time and thought usually goes into my pillows, quilts and designs. I generally design specifically for my partners or recipients, because I want them to be happy and enjoy what I have made for them. Sometimes, I get it right, and sometimes I totally miss it. That can happen. : ) For my last Pillow Swap Partner, I decided to go with her inspiration mosaic completely and picked one pillow in particular which she had also posted on a previous mosaic for another swap. Can you guess which one it is?

Since my partner loved traditional red and green for Christmas, I knew my direction and wanted to complete the design with a scrappy look.


Starting Fabric Palette

I still had some lovely Kate Spain Charms as well as "Evergreen" leftover from last year's pillow that I made for Rosemarie in our swap.

Double Cathedral Window Pillow for Rosemarie - PS4S 2015

I analyzed the design from Andrea's mosaic and recreated it with EQ7 - my great program to design quilts and print paper piecing patterns. I have the full-blown designer version, but there is a new, mini program on the market which costs half as much and is great for beginners and newbies wanting to design quilts - EQ Mini. The Electric Quilt Company is always having sales, so you can usually find great deals too. If you live in Europe/Germany, I am thinking about providing training classes to those of you who have the program and want to learn how to use it. : )

Here is the design recreated by me. I do not know who to credit for this design; there was no credit information on Andrea's collage. If you know who originally designed it, please tell me, so I can give credit where credit is due.It reminds me very much of the first pillow I made in our pillow swap in 2015.

Framed Kaleidoscope - Recreated in EQ7

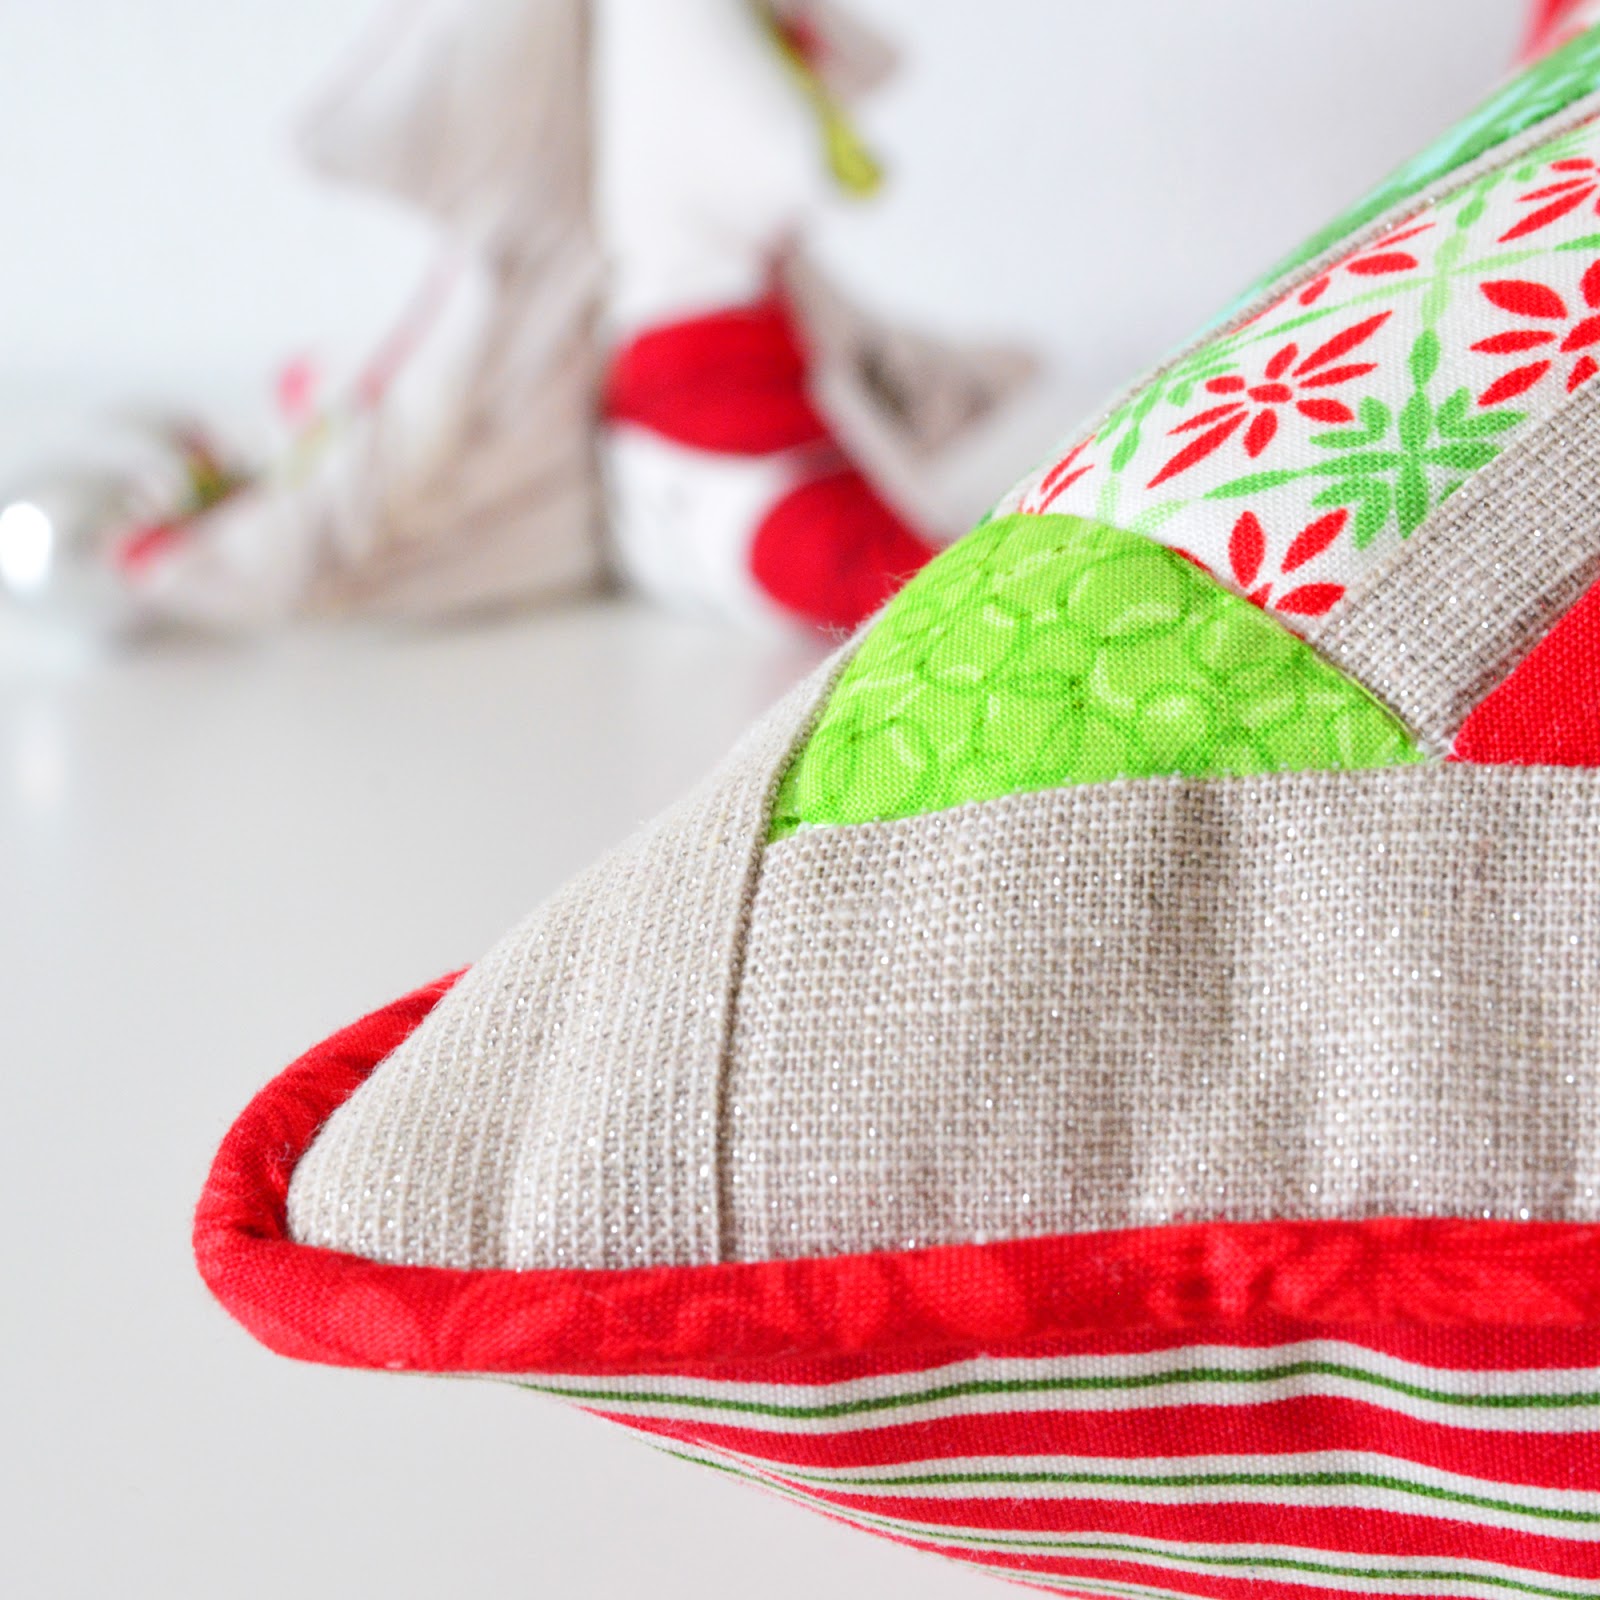
I didn't want to use white fabric in this pillow, but decided on a shimmering, metallic Essex Yarn Dyed Linen that I bought from the Fat Quarter in the summer instead. Please be careful when ironing any RK linen fabrics; they have a tenancy to shrink if your iron is too hot. Some of you know I don't like to iron my fabric too much....I like a warm iron without steam when pressing my patchwork. For straightening my fabrics and getting rid of creases, I use steam but I still use a warm iron. I actually have a non-steam iron that I use when creating patchwork.

I don't normally pre-cut fabric templates when foundation piecing, but when you try to make those scraps work one more time, you get a little creative.

My Chaotic Mess when Creating

The sixteen 4 1/2" FPP (foundation paper-pieced) blocks were made in a couple of days. I was extremely early making the pillow, but I knew I had a lot of appointments in November. I felt really good about the way it was coming together.

16 - Four and One-Half Inch FPP Blocks

Although the design is scrappy, I decided to keep a unity in the middle with two green triangles and two white/silver triangles. It created a slight challenge in the end to balance the entire pillow top and still maintaining the unity of the center squares.

Keeping in mind, I only had one FQ of Robert Kaufman Essex Yarn Dyed Linen, I had to precut my strips to make sure I had enough in the end. This is probably one of the first times, it actually worked too.

As for most pillows, I love the look of piping especially in a contrasting color. I thought this pillow would look lovely with piping as well. I always have a bit of trouble when making piping. I know I should make 1 3/4 inch piping from bias strips, but I am too frugal. I make straight 1 1/4 inch piping and always get myself in a pickle when trying to apply it to the pillow top. I know there is a tool out there too for cutting your piping to exact size after it is made, but again, I am too frugal.

On to the quilting...I used a clear mono filament top thread and polyester white bottom thread and stitched in the ditch. Usually before quilting, I sandwich my top, batting (fusible Pellon 987F thin) and a white inexpensive (IKEA) cotton fabric. I increase my stitch length to 3.0 from 2.5 standard on my Pfaff 2046 Quilt Expressions.I opted to quilt in the ditch to really let the design come out.. That lovely "hand-stitching" is a special quilting stitch on my machine. I have tried numerous times to get it to work for me, but it never would.

**Stitch #27 is a traditional hand quilting stitch.**
To achieve this look correctly, you will need to use clear mono filament on the top and a thicker thread on the bottom. Decrease the tension on your spool about 1/16 to 1/8 of a rotation or five degrees counterclockwise if you can do so on your bobbin spooler of your machine. The red thread you see is actually the bottom bobbin thread....not the top thread. The top thread is clear and becomes invisible on the linen.

Machine Stitching all the Way

For the back of the pillow, I decided to go with a cute pin-striped fabric with traditional red/green. I love striped fabrics and usually save them for binding or piping, but this looks terrific too.


Back of Pillow with Covered Zipper

The stripes got a little wonky in the end when putting in the zipper, but still matches (for the most part).


Covered Zipper and Matching Pin-Stripes

So there she is ladies and gentlemen. You can start to see just a bit of the shimmering fabric from the front in the previous photograph, but it sparkles so much more in natural lighting. Sorry I couldn't capture it better.


The Full Monty - Christmas Framed Kaleidoscope Pillow for Andrea

It was really a pleasure sewing for Andrea. I didn't put myself under pressure when sewing this pillow and allowed ample time to finish. It takes time to make beautiful, quality items. It makes me happy to sew for others and to warm their hearts. I think Andrea enjoyed the pillow as well.

Happy and Safe Holidays everyone! May your days with family, friends, or quality time for yourself bring you peace and joy. We'll see each other next year!

Hugs,
Karen

Thursday, December 8, 2016

pillow swap four seasons - a wonderful experience


Hi everyone! The closing round of Pillow Swap Four Seasons is coming to a close. All pillows have been shipped and more than half have been received. I have to admit too, I have gotten very sad over the last few weeks, because our group is breaking up. Sandra (hohenbrunnquilterin) and I decided not to extend the swap another year. We had two very successful years of designing and quilting pillows for one another four times a year for two years in a row. Instead of going out with a whimper, we wanted to go out with a bang!

These last two years have been really incredible, too. I never imagined to have met such warm and loving women who share exactly the same interests as I do. I am ever grateful for this exchange of knowledge, skills, friendship, camaraderie, as well as warm hearts and pure love from each and every participant in our group.

It is not easy running a swap. Some of you out there know what it takes to be a swap mama, because you are one. It takes a lot of time, energy, and organization as well as people-person skills and flat out patience. The organization was never really a problem for me, but my soft skills could be better. I am not a fluffy person and sometimes get down to the nitty gritty pretty fast. I know this is a major failure/negative point about me. I know it and try to change this behaviour when I think about it. Sandra, the real leader of this swap, on the other hand has magnificent soft skills. She is what held this group together, especially when my fluttered brain didn't see things clearly, she knew exactly what was going on. An incredible thank you goes out to you, Sandra! Thank you for helping me through these two years by keeping me straight especially when I was wrong.

A big thank you to all of my the people whom I wrongly accused of not shipping on time too or mixing up names of people who sent me a pillow. Man, am I a total idiot when I insult a quilter by thanking someone else; I did that!! Of course I apologized, but it didn't make it any better, from my side that is. I think she took it much better than I would have.

Sometimes I got a little disappointed when I received a brief thank you in the headlines of a posted photograph of my received package. All a lot of thought went into every pillow I designed especially  for each partner I've had. Although I like to incorporate a bit of me into my designs, most of the pillows were truly drawn from the inspiration mosaics from my partners.

Here are all of the pillows made over the last two years for my partners:

Spring 2015 for Dorrie
Summer 2015 for Rita
Fall 2015 for Bettina
Winter 2015 for Rosemarie
I learned how to sew a covered zipper, make covered button, make a double cathedral window, learned about color value, understood the power of scraps.

Then there was 2016....
Spring 2016 for Julia
Summer 2016 for Sabrina
Fall 2016 for Ines
Winter 2016 for Andrea (Stay tuned for more photos.)
I learned my style and how to use contrast to make a design pop. I learned how to make two different kinds of piping - cross grain and bias as well as keeping my stash stocked up...you always have to be ready for the unexpected.

Then I helped making some angel pillows...

2015 for Astrid
2016 for Wendi
I learned the rainbow colors and starting using their color order to influence design.

And then there were those two special pillows I made for Sandra (hohenbrunnerquilterin)...

2015 - Winterverwirrung
2016 - Playful Plus
I learned that I could stitch in the ditch without it looking terrible. And I learned how to make foundation paper piecing to my advantage.

So over the last two years, I have extremely improved my pillow making skills! I even learned how to make buttonholes (but still needs a lot of practice. I learned that I love piping and dislike binding on my pillows.) I also love a covered zipper to keep everything nice and tidy inside. I learned to make a pillow just a little smaller than the size of the insert to make the design stand out better.

Once again...I am going to miss everyone from this group! Thank you for your kindness and your support. Merry Christmas and Happy Holidays to all!

Wednesday, November 16, 2016

quiltmaker's 100 blocks vol. 14 blog tour

We had a really long summer here in Germany and autumn appeared the middle of October quickly followed by a sudden appearance of winter with a touch of snow. Today it looks like a typical autumn day though - overcast, raining, dreary...so I would like to cheer you up with some pretty quick quilt blocks to pep up your day. Quiltmaker's 100 Blocks is having another great blog tour of fabulous designs from today's hottest designers and giving away gorgeous fabrics as well as other prizes every day this week. Please stop by and check it out.

http://www.quiltmaker.com/blogs/quiltypleasures/tag/100-blocks-vol-14-blog-tour/

Oh, I almost forgot! My block is also published in the magazine. You can find it in the centerfold (again). I just love being in the centerfold. My newest block is called "Mountain Range." As you might have guessed, I like to design blocks with nature in mind. This block was inspired by the Appalachian Mountains of N. Carolina, my home for more than a decade before I moved to Germany.

Mountain Range designed by Karen Ackva

Some of you might look at this block and think it is complicated as far as sewing it together. It is much simpler than you think. The magazine gives an excellent explanation as how to sew it all together and your points will match up perfectly, I promise you.

Mountain Range made with Cotton & Steel Fabrics
Have I gotten your creative juices going about what to make with this block? If not, here are a couple of suggestions:

Make a full-sized quilt with the 12" blocks adding multiple sashings and borders. No one ever said you had to make 48 quilt blocks for a quilt - 16 blocks are enough.

Scrappy Mountain Range Quilt ~ 72 x 72 inches

Or shrink the blocks down to 6 inches, make four, set on point and make a modern throw pillow.

Mountain Range Throw Pillow ~ 19 x 19 inches

Go go for an ultra modern look by adding blocks and changing up the arrangement. Add an  interesting border in contrasting colors and you have a new masterpiece your the house. Now wouldn't that make a nice holiday quilt?

Ultra Modern Mountain Range Quilt ~ 70 x 85 inches

Thank you for joining me today. I hope you join up to the other participants along the blog tour Quiltmaker Blog Tour and see all the blocks from extremely creative quilters and designers. Along the way, you will find great prizes, fabrics and always the great quilt publications from Quiltmakers!!

http://www.quiltmaker.com/blogs/quiltypleasures/tag/100-blocks-vol-14-blog-tour/

GIVEAWAY

And let us not forget, I am also giving away a copy of the magazine (maybe more than one) to a lucky person (or more and maybe a few other goodies). Just leave a comment below stating what your favorite block is and why. One entry per person please. (My personal block favorite is the Sweet Cupcake by Krista Lea of Quiet Play at quietplay.blogspot.com, because I love cupcakes!!) I will pick one (or more) lucky winner on Saturday, November 19, 2016.

Good luck and happy patching!

****WINNERS chosen******

Congratulations to PrairieKat and to the Swedish Scrapper for winning. Please contact me so I can get your winning prize out to you. Thank you everyone for participating. Have a great weekend!

Monday, October 17, 2016

a fun little mini swap


It's time again to have some fun. Would you like to make a new patchwork friend? Would you also like to get your creative juices flowing? Well, here is a fun, little, mini swap where you can make scented sachet for someone and receive one in return. No need to worry about high expenses for international shipping either, because all of the sachets will be sent unfilled. You decide what you want to fill it with and do so yourself. How fun is that?


GUIDELINES:
You are allowed to use any pattern you like. You may use any technique you like keeping in mind your assigned partner. It should be something she/he may like.Your finished sachet may include a ribbon for hanging or not. It should be a size that can fit into an ordinary letter envelope. Please send unfilled. Some countries will quarantine for biological (lavender, roses, etc.) hazards. We don't want that to happen, do we? This will also limit the expense everyone has to pay. It should not cost more than a dollars, euros, etc. Remember, you should complete the sachet in less than one hour; it should not be elaborate to time consuming but fun to make!

Please fill out the information below. I will contact you on/before Oct. 21 with your partner information.

You will have until the end of November to complete your sachet. Please send whenever you are finished but before the deadline. Please contact me to let me know you have sent.

Everyone will be assigned a partner. This is an open swap and not secret. You are allowed to contact your partner, and they are allowed to contact you. However, please keep their information (mailing address) confidential.

No mosaics are needed for this swap. You will be sew according to your partner's interests, social media feeds, and direction along the way. We really want you to guide your partner on the right path. If you have trouble making contact your partner, please get in touch with me.

You may post pictures on Instagram of your progress using the hashtag #yourchoicescentedsachetswap. Contact me if you have any problems: karen@easypatchwork.de

DATES AND DEADLINES:
Registration: 17 - 20 Oct. 2016
Partner assigned: 21. Oct. 2016
Shipping: before Nov. 30, 2016

Please send your unfilled sachet with a note card. You may send other items, but please don't over do it.

Are you ready for a little swapping fun? Then go ahead and register.

Click on the link below:

Registration is closed. You will receive a partner shortly.


Have fun!!

Saturday, September 17, 2016

orange peel pincushion tutorial

It's been a while since I put out a free pattern or tutorial, and I know how you all just love freebies...so here is a goody for you. This idea came to me last Friday when I was walking home from dropping my daughter off at school. I love orange peels and cathedral windows, and this is a combination of those. I made (4) one-inch scrappy (foundation paper pieced) diagonal blocks, basted two pieces of same-sized squares folded on top and sewed all four blocks together. I threw on a couple of borders, sewed some lovely Robert Kaufman Essex Yarn Dyed Linen in black on the backside, filled with cornmeal, finished off with a ladder stitch and there you go. BOOM!


If you didn't quite understand all of that, we'll go through this step-by-step. I love pictures and hope there are enough for you to understand where this is going.

Materials Needed:

Various rainbow scraps for diagonal blocks
(8) 1 1/2" x 1 1/2" Low Volume fabric squares for windows
(2) 1" x 2 1/2" purple fabric strip for border
(2) 1" x 3 1/2" purple fabric strip for border
(1) 3 1/2" x 3 1/2" backing fabric
about ½ cup or 100 grams of small grain or filling 
such as crushed walnut shells, cornmeal or grits
(4) 1-inch diagonal strip block templates for foundation paper piecing. You can make your own or download the complete pattern found on Etsy.
Hand sewing needle & thread 

  • Makes one, three-inch pincushion. 
  • Knowledge of foundation paper piecing is required. 
  • Knowledge of how to make a pincushion can be helpful as well as a ladder stitch
  • Please use a scant 1/4 inch seam allowance when sewing. 
  • Reduce your stitch length to 2.0 or 1.5 to allow for easier paper removal and better endurance.


Let's get started....

Cut out four templates from the one-inch diagonal strip blocks template sheet free for download.


Make four blocks in four different colorways using the fpp templates. I chose yellow, red/orange, greens and blues. Make sure you overlap the seam allowance on the foundation paper with ample fabric. You can always cut off the extra.


Trim up your one-inch blocks using the seam allowance guide on the back, a good ruler and rotary cutter. (My, oh my, how those blocks look so much cuter when they are squared up.) Take your papers out now. (I left mine in.)


Take all eight (8) 1 1/2" x 1 1/2" squares and fold them in half diagonally. Press with a warm iron. 


Place one folded square (now a triangle) over each foundation pieced block as shown below.


Place the second triangle over the block and baste using a 1/8th seam allowance. Please be very accurate in this step. If you are not, the windows might not line up on all four blocks. (The blue and green diagonal strip blocks are swapped in this foto. I just wanted to see if you were paying attention.)


Once all four blocks are basted, connect two blocks. Press seam open or to one side. Sew the other two blocks together and then connect to make a four patch. Attach borders.


Open your windows and pin in place. Now doesn't that look pretty!!?? 

NOTE: You could put a little piece of fabric in the middle to make a Cathedral window.


Still using a stitch length of 2.0 to 1.5, top stitch the windows in place.


Layer your backing fabric and pincushion top right sides together (RST). Sew around the outside leaving a two inch gap along one side to flip. Trim corner at a 45° angle to get a sharp corner. Flip. Thread a hand needle with a color matching your backing fabric. 

Sorry - NO FOTO for this step! I was sewing instead. : )


Start to sew the seam shut. Using a small funnel, fill your pincushion up with the small grain filling. I used (organic) cornmeal, because if flows through my funnel easily and has the right grain size.  Continue to sew the seam shut and filling with more grain. All finished.


You also can make a classic orange peel like this:


Or you can make all kinds of other variations such as only using one triangle per block.


Or flip the block around to make a pinwheel.


I would love to see what you can come up with. Please post your photos on Instagram so we all can see. Use the hashtag #eporangepeelpincushion. Or drop me an email. 

If anything is unclear, please feel free to drop me a note, and I will try to make it clearer for all.  


Thanks for dropping by! Happy sewing! Feel free to look around. I have a lot of other tutorials and freebies here on my blog.

Thursday, September 8, 2016

sedona star quilt

Hello my dear quilty friends! I would like to share my newest pattern with you, the Sedona Star Quilt for Quilts from Quiltmaker's 100 Blocks on stands now! 


Just pop on over to Quilty Pleasures Blog to see this exciting pattern for a throw quilt. If you live abroad and can't find the magazine, you can download the PDF directly from their website. Oh, and did I mention, I am also a guest blogger on their site today?! You can learn all about me and how I fussy cut most of the blocks in this quilt. (Psst. I spy the gecco, do you too?)
Sedona Star Quilt -  Designed and Sewn by Karen Ackva, Quilted by Sabine Feldmann

Thanks for stopping by! Please feel free to leave a comment or some criticism. I love reading what you have to say. : ) You make my day!

-Karen

Sunday, September 4, 2016

Rainbow Peel-iscious

And that is a wrap for this gorgeous pillow... I decided to go with a little rainbow piping. From each of the Lecien L's Modern Basic charms used in the pillow plus a couple others to fill in the gaps, I cut a 1 5/8 inch strip and connected them on the straight grain. Normally you would use a biased piping, but I had to work with what I had. Otherwise, I wouldn't have had much fabric to work with if both sides were cut off diagonally. That purple corner was a little tricky, because I actually started sewing after that corner instead of before the corner, but I managed to get it together.


Working with Robert Kaufman's Yarn Dyed Essex Linen is a dream. I first used it when I designed and made the "Countdown to Christmas" Advent Calender last year for the Fat Quarterly. I am not sure this E-Zine publication is still available due to a conflict of interest of international trading zones.


I do have one word of advice about it though. Do not iron it too much or at a high temperature. IT WILL SHRINK!

As far as the back of the pillowcase, I wanted to make a hidden zipper but thought about an interesting element of having the zipper stand out. I used a little red fabric leftover from the front of the pillow for a zipper end on both sides. I used the fake Sashiko stitching from the from and top stitched the zipper on both sides. It doesn't look as good as the front and I had to figure out why. I used a very thin polyester bobbin thread when appliqueing the orange peels on the front. When top stitching the back, I used 100% cotton for both the top and bottom threads. This diminishes the effect.


Because we have had such nice summer weather this year, I wanted to get out and take some pretty location photos. These are my favorites.

Sitting in a Windowsill
Hiding in the Pumpkin Patch
This pillow was really fun to make. I brushed up on my applique skills again which I need to do every now and again. I like the radiation of color from the center outwards too. I will not be keeping this one, although I really want to make a pillow for me or for my family. (I have an idea.) This is a very special "angel" pillow for someone who did not receive one in the summer round of Pillow Swap Four Seasons. I regret to say, it seems that every round something happens to one of the pillows or one of  the participants. I really hope the new "owner" will like it. : )

Thank you for dropping by!